
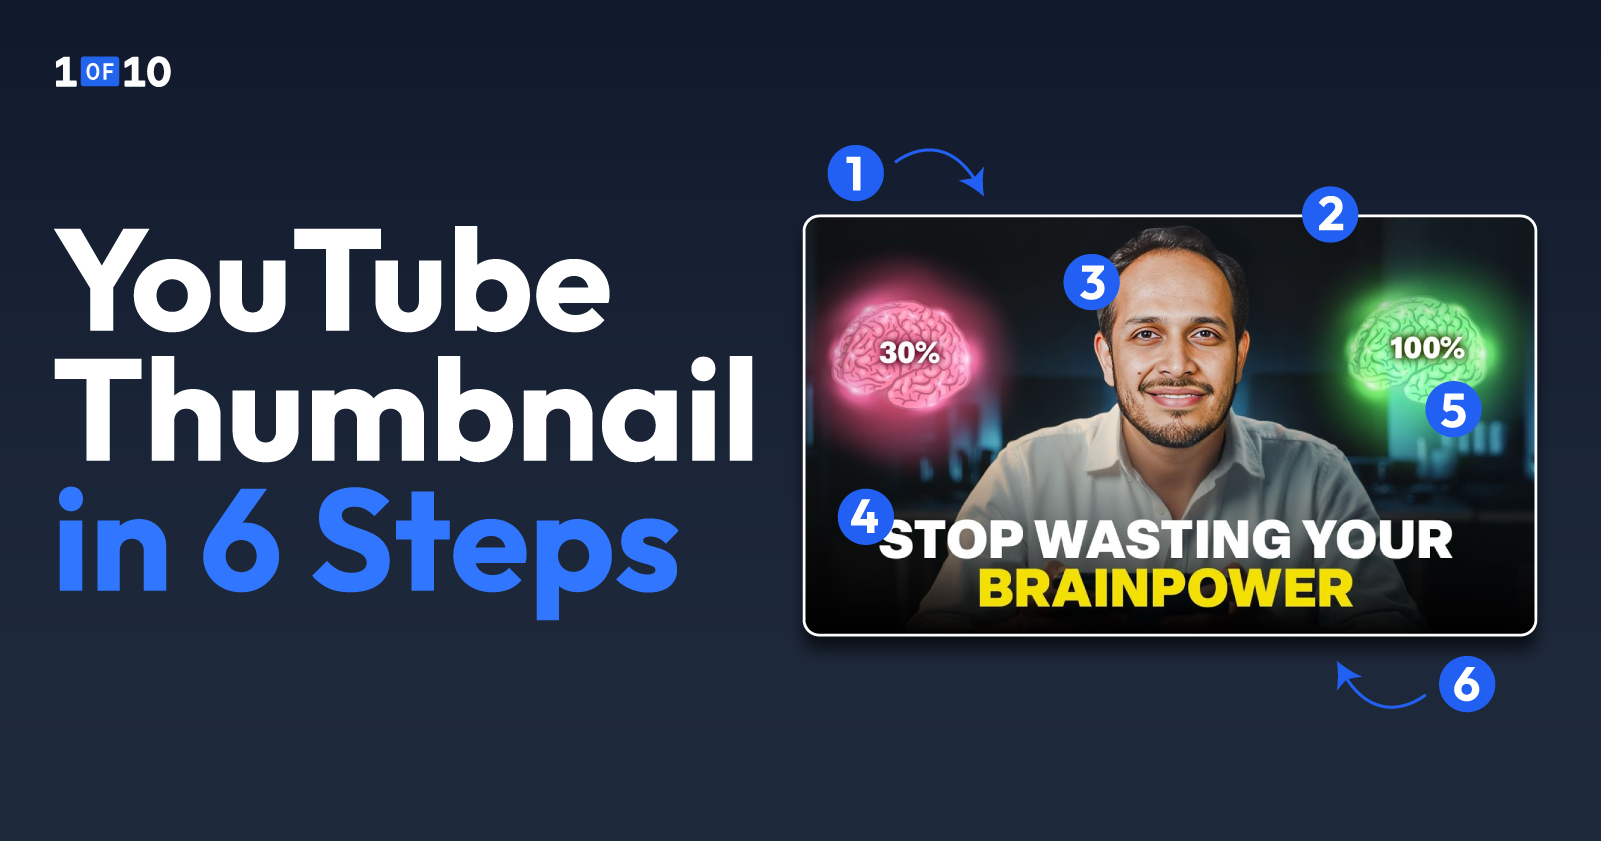
How to Make a YouTube Thumbnail in 6 Steps (2026)
Learn how to make a YouTube thumbnail that gets clicks. 6 steps from planning to upload, plus a comparison of the best thumbnail tools for creators.
Your thumbnail is the reason someone clicks or scrolls past. 90% of the top-performing videos on YouTube use custom thumbnails. Not auto-generated frames. Not random screenshots pulled from the timeline.
But knowing that thumbnails matter and knowing how to make a thumbnail that actually earns clicks are two different problems.
Most guides hand you a Canva template and call it done. That works if your goal is a thumbnail that looks fine. It doesn't work if your goal is virality and channel growth.
Here's the full process in six steps: planning, dimensions, base image, text, contrast, and generation or upload.
You'll also see a side-by-side comparison of the tools worth using in 2026, including AI thumbnail generators trained specifically on YouTube performance data.
TL;DR: How to Make a Thumbnail for YouTube
- Always plan your thumbnail by identifying the single curiosity gap or emotion that drives the click decision, and match it to your video title.
- Ensure your dimensions are exactly 1280 x 720 pixels and keep all critical visual elements above the bottom 20% "safe zone" for mobile screens.
- Stage a separate, high-quality photo with an exaggerated expression, as faces are the highest-performing element in thumbnail design.
- Limit text on the thumbnail to five words or fewer and use a bold, sans-serif font that remains readable when shrunk to mobile size.
- Design for high color contrast and clarity by ensuring the composition has only one dominant focal point the viewer's eye goes to immediately.
- If you want the fastest path from idea to a finished, high-performing thumbnail, try 1of10's AI thumbnail generator free.
Step 1: Plan Your Thumbnail Before You Open Any Tool
The biggest thumbnail mistakes happen before any design work starts. Creators open Canva, pick a template, and figure out the message as they go. The result is a thumbnail that looks finished but doesn't communicate anything specific.
Planning takes 30 seconds and changes the outcome entirely.
Start With the Click Decision, Not the Design
The best thumbnails are designed backwards. Before you touch any tool, answer one question: what single emotion or curiosity gap makes this thumbnail worth clicking?
Write that answer down in one sentence. A few examples:
- "Viewer sees a shocking before-and-after result."
- "Viewer wonders what's inside the box."
- "Viewer feels the tension of a countdown."
If you can't articulate the hook in a single line, the idea is too complex for a thumbnail and needs simplifying.
This step takes 30 seconds. It saves you from spending 20 minutes building a thumbnail that looks polished but doesn't communicate anything.
Match Your Thumbnail to the Title (They Work as a Pair)
Your thumbnail shows. Your title tells. Together, they form a complete pitch to the viewer. Separately, each one should make sense, but they should never repeat each other word for word.
If your title says "I Tested Every Budget Camera for 30 Days," the thumbnail should show the aftermath: your face looking exhausted next to a pile of cameras. It should not say "Budget Camera Test" in large text. That's just restating the title, and the viewer already sees the title directly below the thumbnail on every YouTube surface.
Think of it like a movie poster and its tagline. The poster is visual. The tagline adds context. Neither duplicates the other.
Step 2: Get the Dimensions Right
Once your hook is locked in, the next thing to nail is the technical setup. Wrong dimensions are the fastest way to get a thumbnail rejected, displayed blurry, or cropped in a way that destroys your composition.
The specs are simple, but they're non-negotiable.
YouTube's Official Thumbnail Specs
These are the numbers that matter. Get them wrong and YouTube will either reject the upload or display a blurry, cropped version.
- Resolution: 1280 x 720 pixels (minimum width 640px, but always use the full 1280 x 720)
- Aspect ratio: 16:9
- File formats: JPG, PNG, or GIF. JPG is recommended for photo-heavy thumbnails. PNG works better for graphics with text overlays that need crisp edges.
- File size: Under 2 MB. YouTube has been rolling out 50 MB support for TV-optimized thumbnails, but stick to 2 MB until the higher limit is available on your account.
For a deeper breakdown of sizing across devices, see the YouTube thumbnail size guide.
Safe Zones: What Gets Cropped on Mobile
Your thumbnail shares screen space with YouTube's interface elements:
- The duration badge covers the bottom-right corner
- The video title overlaps the bottom edge on mobile
- On smaller screens, the bottom 15-20% is partially obscured
Keep all text and critical visual elements above the bottom 20% of the frame and away from the bottom-right corner. The safe area for essential content is roughly 1100 x 620 pixels centered on desktop, and 960 x 540 pixels on mobile.
Step 3: Choose Your Base Image
With the canvas sized correctly, the next decision is what fills it.
The base image is the single biggest driver of whether a thumbnail feels professional or amateur, and most creators get it wrong by defaulting to whatever's easiest: a frame pulled straight from the video.
Use a Staged Photo, Not a Video Frame
Do not grab a random frame from your video timeline and call it a thumbnail. Timeline frames are shot for video, not for still images. The lighting is usually flat, the subject's expression is mid-sentence, and the background is whatever happened to be behind them.
Instead, stage a separate photo with intentional lighting, a clear subject, and a clean background. The difference in quality is visible even when the thumbnail renders at 150 pixels wide on a phone screen.
If you genuinely can't stage a photo, at minimum pick a frame where the subject is in sharp focus and the background isn't competing for attention.
Faces and Emotions Outperform Everything Else
Human faces are the single highest-performing element in YouTube thumbnail design. This isn't opinion. It's a well-documented cognitive bias called face detection: the brain is hardwired to notice and read faces before processing any other visual element.
Exaggerated expressions outperform neutral ones. Shock, joy, confusion, and surprise all trigger curiosity in the viewer. If the video warrants an emotional reaction, show it at full intensity. Subtle doesn't work at 150 pixels.
Faceless Channels: Objects, Scenes, and Visual Hooks
If your channel doesn't feature a face, you still need one dominant visual element. Options that work well:
- A single product shot against a clean background
- A before-and-after split
- A visual metaphor like a pile of cash, a broken gadget, or a countdown timer
The principle is the same: one clear subject, not a collage of five things. Faceless thumbnails that try to communicate too much at once become unreadable noise at mobile size.
Step 4: Add Text That Works at 150 Pixels
A strong base image carries most of the click. Text amplifies it. The mistake creators make is treating thumbnail text like body copy, cramming in context the title should handle.
Thumbnail text has one job: land instantly at mobile size.
The 5-Word Rule
Keep thumbnail text to five words or fewer. This is the most commonly cited guideline across YouTube creator education, and it holds for a practical reason: anything longer becomes unreadable when the thumbnail shrinks to mobile preview size.
If you need more than five words to communicate the hook, the concept is too complex for the thumbnail. Move the extra context into the title, where the viewer can read it in full.
Font Size and Placement
Use a bold, sans-serif font. At 1280 x 720 resolution, the minimum readable size on mobile is roughly 60-80pt. Thin, decorative, or serif fonts tend to blur together at small sizes.
A few placement rules:
- Place text in the top third or along the left side of the frame
- Never cover the subject's face
- Never stack text along the bottom edge, because it gets cropped by the title bar on mobile
- White or yellow text with a black outline or drop shadow stays readable on almost any background
After placing your text, try the shrink test: reduce the thumbnail to about 120 pixels wide, which is roughly how it renders in YouTube's mobile feed. If you can't read the text at that size, simplify or enlarge it.
Step 5: Design for Contrast and Clarity
Composition is the last design step before export. Even with the right image and the right text, a thumbnail can fail if the colors blur together or the eye doesn't know where to land. Three habits handle most of it.
Color Contrast (Light on Dark, Dark on Light)
High-contrast color pairings are not a stylistic preference. They're a legibility requirement. YouTube thumbnails render at 120-150 pixels on mobile screens. Subtle gradients, muted tones, and low-contrast combinations disappear at that scale.
Pairings that survive the shrink:
- Yellow text on a dark background
- White on deep blue
- Red on white
For more on which color combinations drive the highest click-through rates, see the guide on the best colors for YouTube thumbnails.
One Focal Point, Not Three
Every thumbnail needs one dominant element the eye goes to immediately. A face, an object, or a text hook. Not all three fighting for attention at equal weight.
If your thumbnail has a face AND bold text AND a background object, decide which one leads and make the others secondary. You can:
- Reduce the size of competing elements
- Reduce their saturation
- Push them to the edges of the frame
Viewers make the click decision in under a second. If their eye doesn't know where to land, they scroll.
The Squint Test: Shrink to Mobile Size and Check
Before you export, shrink the thumbnail to the smallest preview size your tool allows and squint at it. Ask yourself:
- Can you still tell what the thumbnail is about?
- Can you read the text?
- Can you identify the subject?
If the thumbnail becomes an unreadable blur, the composition needs simplifying. Remove an element, increase the size of the focal point, or boost the contrast. This test takes five seconds and catches most thumbnail design problems before they go live.
Step 6: Generate, Edit, and Upload Your Thumbnail
You have two paths here:
- Design a thumbnail manually in a tool like Canva or Photoshop, dragging elements into place and exporting a file.
- Use a YouTube thumbnail maker powered by AI trained on YouTube data, which handles composition, text, and visual hierarchy for you.
The choice depends on your skill level, your weekly upload volume, and whether you want full manual control or a faster workflow.
Here's how the main options compare.
The Tool Comparison: What to Use in 2026
1of10 is the only tool on this list trained specifically on YouTube outlier data: videos that outperformed their channel's average by 10x or more. It produces finished, production-ready thumbnails you can upload directly to YouTube. No refinement in a second tool needed.
The free plan includes 60 credits (roughly 12 thumbnail generations) with no credit card required, and a Chrome extension that integrates directly into YouTube's interface.
The other tools serve different needs:
- Canva and Adobe Express: strong general-purpose design tools with template libraries that work well for creators who want hands-on control over layout and branding.
- Photoshop: the deepest manual editing capabilities, but requires design skill and a paid subscription.
- vidIQ: primarily a YouTube analytics and SEO platform that includes thumbnail generation as a secondary feature.
For a full breakdown of every AI thumbnail tool on the market, see our guide to the best AI thumbnail generators.
Try 1of10's AI thumbnail generator free. No credit card, 60 credits included.
How to Upload a Custom Thumbnail to YouTube
Once your thumbnail is ready, uploading it takes under a minute. Your YouTube account must be verified first (go to youtube.com/verify if you haven't done this).
- Open YouTube Studio
- Select Content from the left menu
- Click the video you want to update
- In the Thumbnail section, click Upload thumbnail and select your file
- Click Save
Changes may take a few minutes to appear across all YouTube surfaces. If you see a "Daily custom thumbnail limit reached" error, wait 24 hours and try again.
Start Making Thumbnails That Get Clicks
The process is six steps: plan the click hook, set the right dimensions, choose a strong base image, add short text, design for contrast, and generate or upload. Every step matters, but the biggest gains come from the first one (knowing why someone will click) and the last one (using a tool built for YouTube).
If you want the fastest path from video idea to finished thumbnail, try 1of10's AI thumbnail generator free. 60 credits, no credit card, and thumbnails trained on what actually performs on YouTube.
FAQs About Making YouTube Thumbnails
What Size Should a YouTube Thumbnail Be?
A YouTube thumbnail should be 1280 × 720 pixels with a 16:9 aspect ratio, saved as a JPG or PNG file. YouTube increased the maximum file size from 2MB to 50MB in March 2026 to support 4K thumbnails on smart TVs.
How Do I Make a YouTube Thumbnail for Free?
Several tools offer free plans. 1of10 includes 60 free credits (roughly 12 thumbnail generations, no credit card). Canva's free tier gives you access to templates and basic editing. Adobe Express offers 25 free AI credits per month.
What Makes a Good YouTube Thumbnail?
One clear focal point, readable text at mobile size, high-contrast colors, and a face or visual hook that triggers curiosity. The thumbnail should accurately represent the video content. If the viewer clicks expecting one thing and gets another, your retention drops and the algorithm notices.
Do I Need Custom Thumbnails for YouTube?
Yes. 90% of the best-performing videos on YouTube use custom thumbnails. YouTube's own creator education recommends them. You'll need a verified account to upload custom thumbnails, which you can set up at youtube.com/verify.
Can AI Make Thumbnails for YouTube?
Yes. AI thumbnail generators like 1of10 produce finished, production-ready thumbnails trained on YouTube performance data. The best tools generate thumbnails you can upload directly, not rough outputs you still have to finish in Canva or Photoshop.
How Do I Add a Custom Thumbnail to My YouTube Video?
Open YouTube Studio, select Content, click the video, click Upload Thumbnail, choose your file, and click Save. Your account must be verified first. It may take a few minutes for the new thumbnail to appear across YouTube.